Friday, January 29, 2010

Messenger Bag turned Scripture Bag

My Husband had a Messenger Bag like this that he wasn’t using anymore and asked me if I could make it into a cool Scripture Bag that he could take to church.

image

So he drew up some ideas of what he wanted in the bag and I figured out the best way to accomplish it with the least amount of cutting, unpicking, and stitching. Here it is:

DSC_0005

DSC_0004

DSC_0003

Basically I cut down the middle of the original bag and then re-attached one of the side pockets to enclose the bag again. I then shortened and re-attached the front flap. Used some scraps from the strap and front cover to make a handle to attach to the top. Then attached buckles!!!

Voilà a messenger bag turned scripture bag!!!


Participating in:

giveaways

Saturday, January 23, 2010

Coastal Giveaway

Kendall @ Finsse You Nest is doing a giveaway of some Coastal themed items.  I am way excited as this is what my living room decor is.  So swing on over and you could win this:

Shell Topiary

image

and this:

A bag of Jute balls

image 

You have until Monday January 25th @ 10:00 am to enter so head on over to Finesse Your Nest.

Thursday, January 21, 2010

LBB/Dharma Design Entry #1

Here is my first entry for the Lil Blue Boo/Dharma Trading Design Challenge.  I used the LBB Recycled T-Shirt Hoodie Pattern.

“Monster Truck Rally”

Picture 092

The line that goes across the front of the shirt was the source of inspiration for adding the Monster Truck Appliqués. 

Picture 055

One of the changes I made to the pattern was I did the sleeves as two layers.  I made them so I can detach the lower sleeve when it warms up.  That way my son can wear it now and wear it through the summer.

 Picture 056 Picture 059

I love this tunneling affect the pocket gave!!!

Picture 134

Picture 139

My Handsome model!!!

 Picture 087

Monday, January 18, 2010

Krafty Moments Monday

For my Krafty Moments Monday Feature I would like to introduce you to this cute little creature:

image

Isn’t he such a cutie.  You can find him over at Childmade and see how to make this “Sock Seal Softie”.

Childmade

Now join in on the fun and link up your latest Krafty Projects, anything you want, old or new!!!


Monday, January 11, 2010

Knock-Off Wood

I tend to be just behind the trend so you guys may already know about this awesome blog but just in case there are some of you like me who tend to find out things later than everyone else I want to introduce you to Knock-Off Wood

I heard of Knock-Off Wood from U create (a crafty blog that I follow).

Ana White creator of Knock-Off Wood provides you with the plans to make Knock-Off furniture similar to those found at Pottery Barn, Land of Nod, etc. (click on the pictures to go to plans)

I love these chairs

image

Love the Chalkboard doors

image

When I have an entryway

image

I have some scraps for this

image

How about this

image

An entire play town

image

Now I just need a woodshop, LOL!!!!

Saturday, January 9, 2010

Dried Cherries are a new staple…

On rare occasion I come up with a really good idea to implement in my attempts to cook something other than spaghetti everyday.  Here’s one of those rare discoveries:

Dried Cherries have become a new staple at our house.  Not only are they good to eat by themselves but they are also good with chocolate, salads, and pancakes. 

The pancakes are yummy with just the cherries but super delicious if you add chocolate chips and the cherries to the pancakes.  Sweet and tasty without the syrup!!!

Picture 060

I also added them to Rocky Road to make this great treat FABULOUS!!!

 Picture 062

Ingredients:

Melting chocolate (I used a Gharadelli chocolate brick)

Marshmallows

Walnuts (chopped)

Dried Cherries

* Melt the chocolate according to package instructions,.  Then add marshmallows, walnuts, and dried cherries to the melted chocolate.  Butter a brownie dish and then spread mixture in the pan.  Put in refridgerator for a little while to set the chocolate up.  Then cut and serve.

Tuesday, January 5, 2010

Couch Tissue Box Cover

I saw these Couch Tissue Box Covers online here and wanted to make one just like it for my husband but then decided to make one with some cute fabric for my first try. It turned out so cute. Not perfect on the first try but pretty good!!!
Picture 035
Here’s the tutorial so you can make one too!!!
Materials
1- Tissue Box 160ish count 2-ply (if you use a different size box you’ll need to adjust the size of the squares).
1- Fat Quarter (if using a material that’s print isn’t just random all directions then you will need to get 2 fat quarters or a 10” x 45” piece of fabric to make sure the print goes the same way).
1- Fat Quarter of a different color/pattern to make the pillows and ruffle.
1- 3ft long strip of Velcro (I used a 3/4” wide and cut it in half)
1- A little bit of stuffing
Directions
Cut:
1) 9” x 10 1/4” rectangle (top/front)
1) 4.5” x 10” rectangle (back)
2) 5 3/4” x 4.5” rectangle (sides)
or you could cut one rectangle that is 19” x 4.5” instead of having separate back and side pieces.
1) 4” x 46ish” strip (ruffle)
4) 3” x 3” squares (pillows)
2) Couch back pattern
Here’s everything you should have (if doing separate back and side pieces) except the pillows:
Picture 001
To start off sew the side pieces to the back piece with right sides together like this using a 1/2” seam allowance (skip this step if you made the 19”x 4.5” piece) :
Picture 003
Then sew the Couch back pieces together using a 1/4” seam allowance leaving an opening in the bottom.
Picture 004
Trim the corners and make slits in the curves. Then turn it right sides out.
Picture 005
Lay the couch back onto the back/side piece you just stitched together. Using a 1/4” seam allowance baste it in place except where you left the opening in the couch back piece (you still need to stuff the couch back piece but it’s easier to sew when it’s unstuffed).
Picture 007
Then take the top/front piece and sew a 4” long button hole centered about 2” from the 10” side. Picture 011
Now center the 10” side of your t0p/front piece to your back/side piece right sides together. Start stitching on one side of the opening in the couch back piece. You will stitch around the top/front piece moving the back/side piece to wrap around the corners of the top/front piece until you reach the other 10” edge of the top/front piece. Once you’ve done one side repeat starting at the other end of your opening and doing the same. ** YOU SHOULD STILL HAVE AN OPENING SO YOU CAN STUFF THE COUCH BACK PIECE**
Picture 008
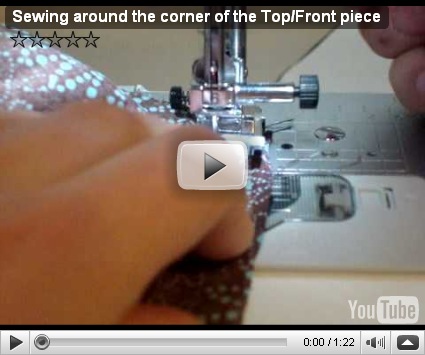
This video shows how to maneuver around the corner. I hope it helps. (I don’t do any talking in it and I knock the camera over once but this is the first time I’ve made a video and will hopefully do much better in the future).
Now stuff the couch back piece and then stitch it closed.
Picture 013
Fold the bottom edge of your couch over and stitch it to finish the edges. Now your couch is done if you have a 160 count tissue box. If you have a larger 230 count box then you can make the ruffle attachment so you can use the couch on either size of box.
Picture 016
Ruffle instructions:
Take your ruffle strip and fold it in half right sides together. Then baste stitch about 1/4” from raw edges. Pull one string on each end to gather the piece until it is about 28 1/2” long. Tie a little knot in the ends of the strings you were just pulling so the ruffle doesn’t come out. Now Stitch the two ends together forming a circle.
Picture 032
Now attach the hook portion (rough part) of your Velcro to the outer raw edge of your ruffle and attach the hook portion (soft part) to the inside bottom edge of your couch cover. **I started sewing the Velcro on and then trimmed the excess off once I got close to where I had started.**
Picture 033
Pillows
I then decided to add some pillows that matched the ruffles. Basically sew the 3” x 3” square pieces together with right sides together but leave an opening. Turn right sides out, stuff and hand stitch the opening closed.
Now you have a couch complete with ruffles and pillows!!!
Picture 035
** Can also be used as a couch for Barbie dolls just don’t make the button hole. My daughter loves the couch so I will probably make one to the scale to fit a matchbox for her dollhouse.**
I would love to see some pictures of the items you’ve made from my tutorials. Feel free to send me an e-mail or link up to my Krafty Moment Mondays which will be starting again on January 11th!!!


giveaways
imageimage


Friday, January 1, 2010

LBB & Dharma Trading Design Challenge

I’m a huge fan of Lil Blue Boo and they have teamed up with Dharma Trading  Co. for a Design Challenge Contest.    I plan on entering into the contest and have already hit the drawing boards!!!
Here’s the challenge:

“Create a unique outfit for a girl or boy using a Lil Blue Boo pattern. Alterations to the patterns ARE allowed as well as additional coordinating clothing items and accessories! I want you to have as much creative room as you think you need!
Use at LEAST one of the following techniques in your creation: fabric dyeing, fabric painting, stenciling, fabric transfers, screen printing or other embellishments (including applique).”

**For more detailed information and rules click the button at the bottom of post**


One of my ideas I have brewing is going to be based after this cute hoodie pattern.

image 

I am way excited as I love Lil Blue Boo style and have already implemented a couple of her ideas into a some of the dresses I’ve made for my daughter.  This will be a fun new adventure.  Come join me in the design fun!!!


blogger templates | Make Money Online